


Metrologists will soon have reason to celebrate: The Vernier scale is approaching its 400th birthday. Never mind the opportunities for caliper-shaped cakes and micrometer cookies, its invention represents a critical moment in humankind’s ongoing attempts to quantify the world around them. It’s a bit early to send out save-the-date postcards, however. The auspicious day isn’t until 2031, and since no one knows precisely when French mathematician Pierre Vernier had his metrological “aha” moment, we’ll have to schedule the party for August 19th—his birthday.

Renishaw Central is said to be “a smart manufacturing data platform that collects, presents and actions accurate process and metrology data.
The Vernier scale made astronomical instruments such as quadrants and astrolabes much more precise, allowing ancient seafarers to more easily complete their journeys, and when coupled with a concurrent invention from astronomer William Gascoigne—the micrometer—ancient stargazers found their hunt for planets to be less of a guessing game. About 150 years later, James Watts (of the steam engine) developed the first measuring instrument that combined a Vernier scale with a micrometer screw, followed soon after by lathe inventor Henry Maudslay’s construction of a bench micrometer nicknamed “The Lord Chancellor” for its reputation as the ultimate “court of appeal” in his workshops.
Crossing the Line
Given their advanced age, it’s tempting to label these devices obsolete. After all, dials and digital displays have eliminated the error-prone tedium of reading small marks on a graduated scale, a consideration especially relevant for those of us with aging eyes. And yet, leading metrology providers indicate that the Vernier scale still enjoys a healthy following of machinists who prefer this seemingly antiquated technology over its alternatives.
“Although we offer both electronic and mechanical micrometers, we sell many Vernier-style devices,” says Timothy Cucchi, continuous improvement manager for assembly at The L.S. Starrett Co., Athol, Mass., noting that the popularity level is similar with calipers. “That’s not because they’re more accurate or durable—they’re not—but rather because a lot of people, especially the long-time machinists, just like the feel of a mechanical tool in their hand. That’s what they grew up with, so that’s their comfort zone.”
Mechanical or electronic, care and maintenance of these hand tools is critical. Cucchi offers a wealth of good advice on this subject, starting with the need to keep micrometers, calipers and, indeed, all measuring equipment clean and calibrated. “If I were a machinist, I would begin each shift by wiping down the measuring surfaces of the tools I will be using that day with a shammy or soft cloth, then check that they’re reading correctly,” he says.
“For a micrometer, this means measuring a gage block and, if necessary, adjusting the sleeve with the supplied wrench,” Cucchi continues. “If it’s off by more than a few tenths, though, this could indicate damage, in which case the tool should go to the QC department for evaluation, and be sent out for repair by the manufacturer if necessary.”
Another routine check is to inspect the micrometer for play in the threads, called “shake.” This is easily eliminated by unscrewing the thimble enough to reveal the adjustment nut at the end of the sleeve and then tightening it to remove any slop. While there, apply a small drop of micrometer oil to the threads, then reassemble the tool and calibrate as just described.
Tools, Rules and Checkpoints
Some micrometers are equipped with a ratchet that clicks after applying a predetermined amount of pressure, while others rely on a friction sleeve. Both bring consistency to the measurement process, though, as Cucchi points out, many experienced machinists avoid these features and measure parts by feel instead. “Each of these approaches is perfectly acceptable, provided that’s what was used when calibrating the tool.”
- Cucchi offers a host of additional recommendations
- Store instruments in a clean, dry area
- Avoid temperature extremes
- Check that measuring surfaces are square and properly aligned before use
- Apply rust preventative and remove the battery from electronic devices for long-term storage
- Make sure that components move freely without binding or interference

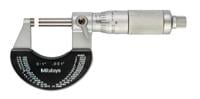
Measuring a gage block (at left) is the preferred method to check that micrometers are calibrated. If not, the supplied wrench can be used to turn the adjustable sleeve.
For those willing to sign up for an online account, these and other guidelines can be found in Starrett’s Tools and Rules handbook, available for download from the company’s literature website.
Aurora, Illinois-based Mitutoyo America Corp. gives similar common-sense advice in its Check Points for Small Tool Instruments handbook, and in its Quick Guide to Precision Measuring Instruments. Each provides a wealth of information about the tools used in the inspection process, with the latter spelling out the basics of statistical process control (SPC).

Vernier-style micrometers remain one of the primary measuring instruments for machinists and inspectors.
What does SPC have to do with the care and feeding of hand tools? Unfortunately, not as much as it should. Starrett’s Cucchi notes that perhaps three-fourths of the shops he knows do not leverage this powerful tool, a figure that Michal Grosenbach, product manager for sensors and small tools at Mitutoyo, agrees with. “I would say most customers are still not using SPC.”
Don’t Fear the R Chart
Grosenbach suggests that one of the reasons for this sad statistic is that shops “are a little intimidated by the technology.” And that’s a shame. Unlike the early days of SPC when operators were tasked with the manual calculation of control limits and creation of X-bar and R charts, followed by the tedium of writing down in-process inspection values, today’s SPC efforts are largely automated—software from Mitutoyo (MeasurLink), Starrett (DataSure 4.0), Hexagon (Q-DAS) and other metrology providers eliminate the heavy lifting of control chart setup, while gathering in-process data is no more difficult than pressing a button on a suitably equipped micrometer, calipers, dial indicator or bore gage.
“SPC is definitely much easier than it once was, but, ironically, a lot of shops just want to get the data into Excel,” Grosenbach notes. “Further, many don’t want to take advantage of Bluetooth or wi-fi, preferring to use a foot pedal to capture measurement values. As we explain in our training seminars, we can accommodate all of these requests—what’s important is that shops begin to use the technology available to them. Doing so can bring significant improvements to part quality and productivity alike.”
More examples of this technology are electronic test indicators that perform functions such as total indicator readout (TIR) and high-low calculations on the instrument itself. This type of onboard processing eliminates the possibility of an operator not picking up the peaks and valleys in an out-of-round condition, thereby skewing the measurement.
Electronic or not, Grosenbach listed some of the more common mistakes he sees users making with test and travel indicators. With the latter, it’s critical that the unit is mounted in a perfectly vertical or horizontal orientation—perpendicular to the workpiece—and that the screw or clamp holding it in place is not overtightened, possibly distorting the housing and mechanism within. Similarly, the contact point on any test indicator should not only be of the correct length for the device (as specified by the manufacturer), but be kept as close to parallel with the body as possible, thus minimizing any “cosine error.”
“People should also take care when using height gages,” Grosenbach says. “Here, it’s easy to overtighten the locking device, or apply too much pressure to the touch probe. Either can lead to inaccurate measurements or even damage the device.”
The Swiss Watch
Uwe Burkardt has a great deal to say about test indicators and, for that matter, metrology in general. The marketing director for TESA Technology—part of Hexagon’s Manufacturing Intelligence Division represented in the United States by TESA USA, North Kingstown, R.I.—he echoes his counterparts at Starrett and Mitutoyo: Digital is nice, but many in this industry still prefer analog.
“Everybody loves Industry 4.0, automated data collection, wireless connectivity and all the rest, but walk into a lot of shops and you’ll hear, ‘We don’t need all that electronic stuff,’” Burkardt says. “That may change over the next decade or two, but for now, I’m impressed at the market size for these older mechanical devices. For many people, change is scary.”
Burkardt also agrees on another point: Don’t cheap out on your measuring tools. “For example, people sometimes tell me that our dial indicators are too expensive. ‘I can buy two of the value-brand indicators for the price of a TESA Browne and Sharpe,’ I’ll hear. I tell them to look inside. We use metal gears and a jeweled mechanism that will last for decades. It’s like a Swiss watch, not something made of plastic that will jam up after a few months.”
That’s good advice for every piece of equipment or tooling on the production floor, especially for the devices used to inspect and qualify machined parts. Here, success is measured not so much by longevity as it is accuracy and dependability—in other words, no one wants to throw away a dial indicator or micrometer that’s failed prematurely, but throwing one away after it’s led to a batch of scrap parts? That’s when you learn the hard way that bargain brands are rarely a bargain.
Making Quality Visible
Yet just as important as quality measuring tools is the need to use the right one for the job, and as with drills and end mills, vises and programming systems, shops have many ways to skin the proverbial cat. Consider bore measurements. Should we use a plug gage (aka go/no-go gages), an inside micrometer, a telescoping gage, an air gage or a dial caliper?

Dial calipers are an indispensable tool, used to measure a wide range of part features.
The answer depends on several factors, including the hole size, depth and required accuracy. Ask Burkardt and you’ll probably hear him recommend an Intrimik. This three-point internal micrometer system covers a wide range of hole sizes, and, when equipped with the appropriate extension, can reach significant depths. But here again, there’s more to the story. Machined holes, for instance, are notorious for triangulation and similar out-of-round conditions, especially when produced on a lathe—it’s only by checking holes with a combination of measuring tools (or a CMM) that roundness, straightness and functional diameter can be determined.
The problem? Metrology is a science, and the method and devices used to measure a part are best determined by those knowledgeable in that science. Thus, a machinist might need to inspect holes with a combination of tools—an Intrimik, a telescoping gage for two-point measurement and a plug gage to check functional diameter. “The decisions on what tools to invest in are too often left to the purchasing department,” Burkardt laments. “In addition, machinists are frequently made responsible for planning the inspection procedure when it should be done by a quality engineer.”
Circling back to Industry 4.0, Burkardt stresses the need to keep up on recent advances. “Change can be scary, but it’s also necessary. The good news is that measuring devices and data collection have become much easier in recent years.
“My advice for shops that are new to this is to invest in a simple device—maybe a Bluetooth-capable micrometer or bore gage. See how it works, start capturing some data, use it to improve your processes and then expand from there. This will help develop trust in the technology and, ultimately, make the company’s quality control capabilities more visible.”
Climbing the Pyramid to CMM Heaven
Handheld inspection tools continue to play a crucial role in most shops’ quality-control practices. But wouldn’t it be great if CNC machinery could automatically inspect the products they make, thus eliminating the need for many tens of thousands of dollars worth of micrometers, gage blocks and pins, surface plates and other metrological accouterments?
Maybe so, yet the industry has a long-held adage that the machine tool used to make the parts should not also be used to inspect them. The purveyors of this maxim will also tell you that the minimum resolution of any measuring device should be no more than 10% of the part tolerance. And while there’s merit to these statements, Dan Skulan will tell you to take them with a grain of salt.
Skulan, general manager for industrial metrology at Renishaw Inc., West Dundee, Illinois, suggests that a high-quality, well-maintained CNC lathe or machining center equipped with a probing system is quite capable of in-process measurement—provided certain criteria are met.

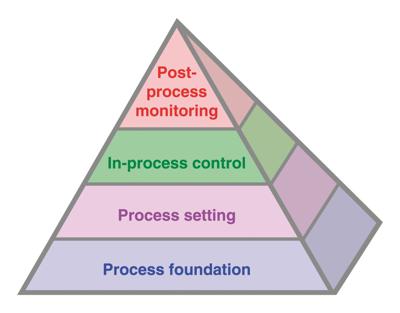
The Productive Process Pyramid from Renishaw is described as a framework to identify and control variation in your factory.
“People get tired of hearing me talk about the pyramid, but it’s a lot like Led Zeppelin’s Stairway to Heaven,” Skulan says. “Go to any wedding reception and someone’s sure to request it, even though everyone’s heard it a million times. That’s because it’s a great song, just like the pyramid is a great way to explain how people can incorporate sound practices into their machining processes.”
He’s talking about Renishaw’s Productive Process Pyramid, a framework said to “identify and control variation in your factory.” Its foundation is built on a strategy of routine machine calibration that identifies and minimizes the sources of machine tool variation. Sitting above this is the use of in-machine probing to reduce setup time and eliminate the potential for “fat-fingering” tool length and part position offsets, followed by probing of the workpiece itself.
Provided the machine is both stable and accurate (based in large part on the pyramid foundation), this step allows for automated offset adjustments, calling up of spare tools and stopping the cycle if something goes awry, all of which is necessary for unattended machining. And at the top of the pyramid sits post-process monitoring via an integrated CMM or comparative device such as Renishaw’s Equator.
It’s the third level that’s most relevant to this discussion, because it provides closed-loop process control, much like a micrometer-wielding machinist. And while Skulan will be the first to admit that the pyramid is not a be-all, cure-all measurement solution, he’ll also insist that in-process probing—when properly implemented—is an excellent way to increase throughput, reduce rework and scrap, and enhance overall capabilities.
“We’re not the only ones on the market suggesting that shops use probes and probing software to inspect parts on a CNC machine,” Skulan notes. “But we are one of the few who question the validity of the data obtained through that process, and the only way you can ensure that is to go through these four steps and ensure that you have incorporated sound practices in each of them. It’s like attending calculus class without first learning addition, subtraction and algebra. You have to master these skills before you can deploy calculus correctly ... it’s the same situation here.
“If you want to measure on the machine,” he continues, “don’t just buy software from somebody who claims they can measure part dimensions, as you may get into deep trouble. You need to go through these four steps first, making sure that everything is in place and you’ve checked all the boxes. That’s what it’s going to take if you’re to survive in tomorrow’s machining world,” Skulan concludes.
